10.31.2013

Happy Halloween!

Happy Halloween, everyone! Hope you all have a magical night of mischief! I plan on it!

Every year, I have an amazing costume idea, and it almost always falls through at the last minute due to time or money constraints. I'm not great with time management, as my followers know very well by now. What sucks is that this year, I totally could have done my costume, but the problem was that we didn't have time to do Shane's costume, and since our costumes relied on each other for full impact, we decided to save it for next year, and we are both pulling off some sweet last minute costumes.

Tonight, we are headed to a local hookah bar to party and get pictures of all the costumes, so I will be posting all of those ASAP!

Have fun tonight, and don't get into too much trouble. ;)

Happy Haunting!
Meagan


10.30.2013

Parmesan Herb Wonton Crackers

Yesterday I made what is now my favorite snack on earth. Wonton crackers! There are SO SO SO SO SO many things you can do with wonton wrappers, I could go on for days. I make jalapeno poppers with them, pizza rolls... you name it. You can pretty much put anything in one of those puppies and bake or fry it up and it's going to be amazing. That being said, it had never even crossed my mind to make crackers with them! I saw a recipe on Pinterest the other day and thought I'd change it up to fit my taste and try it out! Not only did I love them, so did everyone else. I made 4 batches yesterday and they were almost gone by the end of the night! They taste INCREDIBLE, and are so quick and easy to make! 

So, here's how you do it...

Parmesan Herb Wonton Crackers


Ingredients:
(Of course you can change up these seasonings to fit your preferences, but I have to say that this combination was amazing, and these crackers would go great with chili.)
  • wonton wrappers
  • olive oil 
  • salt and pepper
  • oregano
  • parmesan (grated fresh off the block would be ideal, i just went the lazy route and used the canned stuff.)
  • garlic powder


Directions:

Preheat oven to 375 degrees Fahrenheit
Begin by cutting your wonton squares in half to make rectangles. I just took several at a time and cut them with kitchen scissors. Nice and easy. 
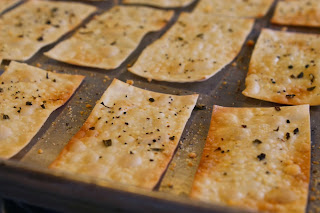
Lay wonton rectangles in a single layer on a baking sheet and brush them with olive oil.

Now,  gather your seasonings together.... 
Sprinkle salt and pepper over wontons, then seasonings of your choice. I used oregano, garlic powder and parmesan. Can't go wrong with that combo! 


Stick them in the oven and bake for 8-10 minutes. Make sure to keep an eye on them in the last few minutes, because they brown up pretty quickly in that time. I like mine to be lightly browned, but some like for them to be a bit darker. I believe each batch of mine went in for about 7-8 mins.

Pull out of oven and let cool for a few minutes. Now you have some incredibly tasty homemade crackers to enjoy!!


10.29.2013

Spicy Roasted Pumpkin Seeds

When you carve out your pumpkins this year, don't toss the seeds away! Roasted pumpkin seeds can be seasoned in a number of ways, and are a great Autumn snack! I like mine to have a little kick to em, but if that's not your style, you can put in less cayenne or take it out entirely. Plain salted pumpkin seeds are also delicious!
As promised, here is the spicy pumpkin seed recipe that I used this year!

Spicy Roasted Pumpkin Seeds


Ingredients:
1 1/2 cups pumpkin seeds
1 tbsp melted butter (olive oil or vegetable oil will also work)
salt
garlic powder (optional)
cayenne pepper (optional)
onion powder (optional) 
cajun seasoning (optional)
1 tsp of Worcestershire (optional)


Directions:

Begin by preheating your oven to 300 degrees Fahrenheit.
Pull all of the strings and pulp off of your seeds, then rinse and drain them. 


Lay the seeds out on a paper towel and lay another paper towel on top. Press down gently on top of the seeds to get rid of excess moisture.

Toss pumpkin seeds in a medium sized bowl with the melted butter and seasonings of your choice.


Spread pumpkin seeds in a single layer on a baking sheet. (I did some fine-tuning of this after I took the picture, make sure you don't have clumps of pumpkin seeds, spread them out as evenly as possible so they bake evenly.


Bake for about 45 mins, stirring every 10 mins or so, until golden brown. After they have been in the oven 30 mins, check on them every 5 mins to make sure they don't burn. Mine came out a tad overdone, because I did not do this. I honestly don't mind, but in the future, I will definitely keep a better eye on them.


Let cool on baking tray, then transfer to an airtight container and enjoy!! 


10.28.2013

Pumpkin Carvings!

Everyone loves to show off their pumpkin carvings, so I thought I'd join in on the fun! I'm no expert carver, and I definitely made a few mistakes here and there, but here are our pumpkins for Halloween 2013!

We found free pumpkin patterns online, because none of us really trust our freehand ability. I used the website Pumpkin Pile to find patterns, there are tons there and they are all free!


Shane and I both worked on the Boo pumpkin at the far left, I did the mediocre kitty pumpkin in the middle, and Shane's mom did an excellent Jack Skellington on the far right.

In the spirit of Halloween and Autumn in general, we saved the seeds and made roasted pumpkin seeds! Stop by tomorrow for the how-to and the recipe I used so that you can make your own!

Have a ghoulish day! ;)
Meagan

10.27.2013

GET EXCITED!

I love makeup. I know a lot of you do too. Some of you are beginners and need some basic advice, some of you have the basics down and want to learn some new tips and tricks, and I'm sure there are those of you who already know a lot and want to know where to go from here! Well, I'm here to help!
I will be doing a Q & A with an amazing makeup artist, Miss Chelsea! Chelsea lived in LA for a number of years doing special effects makeup, she has worked on movie sets, and currently works at MAC! She has so much knowledge about makeup, and loves to teach others!

I have lots of questions ready to go for her already, but if there is anything you would like answered, please leave a comment or send an email to Quirkability@gmail.com so that I can ask her!

10.25.2013

Quick and Easy Broiled Marinated Salmon

I will start this off by saying I am NOT a fish girl. I am very very picky about how my fish is prepared and what type of fish I will eat. Basically, it's either going to be in a sushi roll or fried. Real healthy, right?
That being said, I have been doing dinner almost every night lately, which means there have been a serious lack of fish based meals. I decided to finally man up and try my hand and making fish for the first time ever! It turned out delicious, and I wanted to spread the word so that fish haters can give this a shot and see if it changes your mind! (Plus, it was super quick and simple, so anyone can make it.)

Quick and Easy Broiled Marinated Salmon


Ingredients:
  • 1 large thawed salmon fillet, cut into 6-8 pieces
  • 1 tbsp. packed brown sugar
  • 2 tbsp. butter, melted
  • 1 tbsp. vegetable oil
  • 1 tbsp. honey
  • 2 tbsp. soy sauce
  • 1 packet Lipton Onion Soup Mix
  • 2 medium or 1 large clove of garlic, minced or pressed

Begin by putting your salmon in a glass dish


Mix all other ingredients together in a medium sized bowl with a small whisk or fork


This mixture will be somewhat thick in consistency and look more like a glaze, so don't worry if that's how yours turns out! Cover the salmon like so:


Now stick in the fridge for at least 30 mins, up to several hours. I marinated mine for about 2 hours.

When you're ready to cook it, set your oven to broil, move salmon to a covered cookie sheet (with raised edges! This marinade will run when heated!) 
Pour the excess marinade over the top of the salmon and broil for at least 5 minutes. 
After the 5 minutes, check it after each additional minute until it flakes easily with a fork.
That's all! Now sit and enjoy your delicious dinner. 
Here's what ours looked like: 


10.24.2013

Birchbox October '13

HEY!
I received my first Birchbox this week, and I'm pretty excited!
I love the idea of Birchbox, because I don't wear makeup everyday, but I do want to use quality products. It's nice to be able to try things out in small sizes before you decide whether the full-size is worth the money. I also like it because sample sizes always last a long time with me because I only wear makeup about twice a week.

[SMALL TANGENT ALERT]

The Sephora Favorites set from a couple years ago completely ruined me once I realized what I had been missing out on all these years. I was introduced to moisturizers and primers and all sorts of wonderful things I hadn't even really considered necessary like I do now.
I began moisturizing twice daily...cleansing and moisturizing your face is especially important before putting on makeup, in my opinion. I really love the Laura Mercier Tinted Moisturizer, and I believe that was the one in my SF set. It is not cheap, but it works amazingly, it's light and you can feel the transformation of your skin immediately. For a cheaper moisturizer, I use St. Ives Timeless Skin Moisturizer. This is less than $5 and comes in a 10 oz container which lasts FOR-EV-ER. I currently have two nearly full ones because they were on sale and I probably won't need to buy moisturizer again for at least a year. This moisturizer does work well in that it soaks in quickly and there is a visible and tactical difference, it's also very light and doesn't feel greasy or heavy when applied. But still, nothing compares to the quality of Laura Mercier.
Anywho, once I began using higher quality makeup and skincare products, I started to see my complexion improve and my makeup stayed put so much longer. Now, this is not to say that every expensive makeup item is going to be good, or that all the cheapy ones are bad (because I have definitely found some very inexpensive favorites that I can do a post on another time if anyone is interested..) but that's why Birchbox is great. You can try out those expensive products and decide whether or not they're right for you.

[TANGENT OVER]

Ok, back to Birchbox. Here's what I received this month! (Apologies in advance for the horrible lighting of these photos. I was in a rush when I took these. Promise they will be better next month!)

Lovely, simple packaging

A "Beauty Buzz" card explaining some of the products

Peeling away the tissue paper...

The first thing I picked up was the Benefit Fake Up Concealer. 

Cute packaging! 

A look at the uncapped concealer stick.
I've never used a stick before, always a cream, so I'm excited to try this out!
I have yet to find a concealer that I like, so I hope this works out!

Inside the orange envelope were these two items. Evologie Stay Clear cream and Ruffian Nail Lacquer in "Hedge Fund".
I'll start out with the good... I LOVE LOVE LOVE the color of this nail polish. It is perfect for fall, and being someone who LOVES green nail polish, this is a shade I've never seen before and it is absolutely perfect. It's sort of a metallic olive green with hints of gold, and one coat of it is all you need.
It also looks beautiful on the nail. (I will post pictures with my hands fully painted once I make it to the drugstore to pick up more polish remover!)
And the not-so-good... I was really excited about this Stay Clear cream, because I have been breaking out lately after *STUPIDLY* trying a new facial cleanser that did not make my skin happy. I applied this as directed, and once it soaked in, I happened to rub my fingers just under my chin and there was this weird glue-like residue that rolled off in my fingers. I really do not like that, it makes me feel as though I'm slapping Elmer's on my face. and no one should pay ($62!!!!!) for that feeling. I may try it one more time on the off chance that I applied too much (which I doubt) and see if I change my mind. On the bright side, I did notice one of my more prominent chin blemishes was nearly gone the following day, so in that regard, it is functional. But, to me, it has to look good AND feel good to justify that price. What are they making this with, babies? Anyway...

This is Pop Beauty Aqua Lacquer in Flowering Fuscia gets a mixed review from me as well. I will preface this by saying that I would never normally wear gloss of any kind. It's either lipstick or stain and balm. I have small lips, and making them shiny draws attention, and makes them look even smaller in my opinion.
When I received this, I figured I might as well give it a try and see if it could turn me into a gloss lover. I don't hate it, but I noticed on the Birchbox product description of this, it praises it's non-stickiness. Most of the customer reviews also say it's not sticky. Maybe it's just me, but it defintely feels sticky. It may be that since I normally wouldn't wear it, gloss of any kind feels sticky, but I don't love that feeling. That being said, I do think it looks good. It doesn't have much pigment, so your lips won't be bright pink or anything, this looks surprisingly nude with just a hint of pink on my lips. It also doesn't smell like much of anything, which is kind of nice, because that's what I have perfume for. I also hate when gloss has that fake plasticky kid makeup smell. Big turn-off. This does not smell like that at all. One last thing, the applicator was another turn off for me. It is a small, narrow plastic paddle, and just looked and felt kind of cheap. That's all.

They also threw in this "hydration lock" Chap-Stick, which I actually thought was kind of nice because I keep forgetting to pick up lip balm, and WINTER IS COMING, so I needz dem. We all know what Chap-Stick is like, right? It was like that. Moving on...

So that's it for the first month! I'm so happy with the nail color, which redeems the entire box, and I still have hope for the concealer, which I haven't tried yet, aside from a skin swatch that looked promising. I will get back to you on that soon! I will try the Evologie one more time as promised, and I will probably continue using the gloss whenever I get that rare glossy feeling, and of course will be using the Chap-Stick daily.

Thanks for reading this far, hope this helps you decide if Birchbox or any of these products are right for you! If you have any questions, comment here or email me at Quirkabillity@gmail.com.

I look forward to doing more makeup reviews in the future! Hopefully I can wrangle one of my Make-up artist buddies to do a guest post or Q & A here soon! It would certainly be nice to learn a few tricks of the trade! 

Adios!
-Meagan

10.23.2013

Crab Cakes w/ Mayo-Horseradish Sauce

Crab Cakes w/ Mayo Horseradish Sauce


Ingredients (Crab Cakes):

  • 1 lb crabmeat, finely chopped (we used imitation crabmeat and stuck it in the food processor)
  • 1/3 c. breadcrumbs
  • 3 green onions, finely chopped
  • 1/3 c. mayo
  • 1 egg
  • 1 tsp. Worcestershire sauce
  • 1 tsp dry ground mustard
  • 2 tbsp. lemon juice
  • 1 tsp garlic powder
  • 1 tsp onion powder
  • dash of cayenne
  • dash of paprika
  • 1 tsp salt
  • dash of oregano

  • flour or breading mix for dusting (we used a breading mixture meant for bloomin' onions, feel free to use whatever flour based breading mixture you want, get creative and just mix some of your favorite seasonings into some flour and create your own!)
  • peanut or vegetable oil
Ingredients (Sauce):
  • 1 c. mayo
  • 2 tbsp. horseradish
  • 2 tbsp. lemon juice
  • dash of salt and black pepper

For the crab cakes, get a large bowl, and mix together all ingredients except for the flour and the peanut oil


Shane begged me to stick the crab in the processor so he didn't have to chop it all, and it was way easier.


Here's the crab cake mixture, all combined together:


Form the crab mixture into patties


coat the patties in your breading mixture or flour


For the sauce, add all ingredients above, and mix well.


warm up your peanut or vegetable oil in your skillet, and fry the crab cakes about 3-5 mins on each side, turning ONCE, or until golden brown and crispy


When removing the crab cakes from the skillet, transfer them to a plate with a paper towel to absorb the excess oil


Here is our finished meal! Aside from the crab cakes, I made marinated salmon (which I will be posting about ASAP!), teriyaki rice, and some broccoli & carrots.


ENJOY! 

10.22.2013

Fresh Horseradish

Last week, Shane's dad pulled some horseradish from the backyard garden, and hinted at me to do something with it. I had no idea horseradish was even a plant, let alone that it grew in our backyard, so of course I had to try making some horseradish on my own! It's a lot easier than I thought it would be, so I wanted to pass it along to all of you!

The root of the horseradish plant is what you'll need for this, so make sure you keep it. 
Chop off the leaves, dispose of them, and rinse the root tubes.

They should look something like this: 


Now, take a vegetable peeler, and peel the outer layer off the root tubes. 
They should now look like this:


Now, use a knife and cube the tubes. (I'm starting to think I should turn this into a song...)


Add the chopped up tubes along with 2 tbsp. of water into a blender and pulse until combined and at the desired consistency.


Make sure there aren't any large lumps or that it isn't too stringy.


Add 1 tbsp of white vinegar, and pulse a little bit more in the blender to combine.


Empty all the contents of the blender into a small airtight container. Make sure to use a rubber spatula to scrape out everything, it will get stuck to the sides and under the blender blade. 


Mine had a little extra water, so i held a spoon against it and tipped the container to drain the excess water. 


And now you have your finished horseradish! 
I made this fresh horseradish to use in a crab cake sauce recipe, (1 c. mayo, 1 tbsp lemon juice, pinch of salt and pepper, and 2 tbsp horseradish) and turned a horseradish hater into a lover! 

Have fun!!